The Twin Cities, encompassing Minneapolis and St. Paul, are not just known for their vibrant music scene but also for their excellent audio repair shops. These establishments play a crucial role in keeping the music playing, whether it's for professional musicians, audiophiles, or casual listeners. Below, our vintage HiFi group members have shared their most popular audio repair shops in the area.
Remember to check their websites for the most current services, contact information, and operating hours.
Absolute Sound Labs, Savage (Repairs)
Audio Perfection, Richfield (Repairs / New & Used Retail)
Alex Audio & Video, New Hope (Repairs)
(EARS) Electronic Audio Repair Service, Minneapolis (Repairs)
HiFi Sound, Minneapolis. (Repairs / New & Used Retail)
Midwest Speaker Repair, Roseville, (Speaker Repair / New Used Retail)
Mill City Sound, Hopkins (Basic Turntable Maintenance / Upgrades)
Mnpctech Audio Turntable Isolation (Online Store)
Oleg’s Vintage Audio, Prior Lake, (Repairs) (reputation for not responding to emails)
Rasmussen Turntable Repair in Corcoran, Mn. (Repairs / Used)
SolSta Records, St Louis Park (Turntable Repair Only)
Stereoland, Bloomington, (Repairs / New & Used Retail)
tctubes in St.Paul, (Audio Repairs / Used Audio Retail)
Whether you're in need of expert repairs for vintage audio treasures or modern digital setups, the Twin Cities offer a range of reputable shops ready to serve. Be sure to visit their websites for the most up-to-date information and to verify their offerings, ensuring your audio equipment receives the best care possible.
]]>In this guide, we'll walk you through the steps to troubleshoot and fix the source of the hum. Check out these easy tips to get your turntable humming-free in no time:
1. Check the Grounding: Don't let improper grounding ruin your groove. Make sure your turntable is properly grounded by connecting the grounding wire to the right spot on your amplifier or receiver.
2. Inspect those RCA Cables: Loose or faulty cables can totally cramp your sound. Take a look at the cables connecting your turntable to your amplifier and ensure they're in good shape and securely connected. Switch them out with a different set to see if that solves the problem.
3. Examine the Power Supply: Electrical interference can be a buzzkill. Keep your turntable away from other electronic devices that could be causing interference. Plus, try using a power conditioner or surge protector with noise filtering for some extra peace and quiet.
4. Mind your Turntable Placement: Where you put your turntable matters. Steer clear of speakers or devices that generate a magnetic field. And if you really want to minimize vibrations that cause humming, try using cork vibration-absorbing pads.
5. Check the Cartridge and Stylus: Misaligned or damaged cartridge and stylus can throw off your audio game. Make sure everything is properly aligned and undamaged. Consider replacing a worn stylus or realigning the cartridge to fix the hum.
6. Inspect the Belt (if it's belt-driven): Don't let a worn-out belt ruin your tunes. If your turntable is belt-driven, check the belt for signs of wear and tear. A new belt might be the key to eliminating that hum.
7. Isolate from External Vibrations: Shake, rattle, and hum? No thanks. Put your turntable on a stable, vibration-free surface to prevent external vibrations from messing with your sound.
8. Try a Different Outlet or Room: Your wiring might be the culprit. Plug your turntable into a different outlet or move it to a different room to see if that makes a difference.
9. Upgrade Components: Sometimes, it's all about the quality. If none of the above solutions work, consider upgrading components like the phono preamp. Investing in higher-quality gear can make a world of difference in reducing noise and hum.
10. Call in the Pros: When all else fails, it's time to bring in the experts. If you've exhausted all your troubleshooting options and the hum persists, consult a professional. They can diagnose and fix more complex issues that might be lurking in your turntable.
Remember, finding the source of that pesky hum might take a little trial and error. But trust us, it'll be worth it when you can finally enjoy your vinyl collection without the background buzz.
Mnpctech shares their 19 years of experience in eliminating unwanted vibrations and humming sounds in your analog turntable, and experience the true beauty of vinyl records. In this informative article, we'll unveil the most effective solutions to address these common issues, ensuring a pure and authentic listening experience.
Isolation and Placement:
The first step to banishing vibrations and humming sounds is proper placement and isolation. Follow these key points:
a. Placement: Find a stable surface away from sources of vibration, like speakers or high-traffic areas. Consider using a turntable isolation platform or mount it on a wall for added stability.
b. Isolation: Use isolation feet or platforms to separate the turntable from its surface. These devices absorb and dissipate vibrations, preserving the integrity of your sound.
c. Custom Turntable Plinth: If your turntable has a built-in plinth, make sure it's properly installed and in good condition to minimize vibrations.
Record Mat and Platter Mat:
The right choice of mats can make a significant difference in minimizing vibrations. Consider these options:
a. Record Mat: Invest in a quality mat made from cork, felt, or rubber. Not only will it dampen vibrations, but it will also improve the record's grip on the platter, reducing unwanted noise.
b. Platter Mat: Upgrading to a high-quality platter mat can further reduce vibrations and enhance sound quality, especially when compared to stock mats.
Balanced Tonearm and Cartridge Setup:
Achieve optimal tracking and eliminate vibrations with a balanced tonearm and properly aligned cartridge. Follow these steps:
a. Balance the Tonearm: Use a tonearm balance to ensure perfect horizontal and vertical balance. An imbalanced tonearm can cause vibrations and degrade sound quality.
b. Cartridge Alignment: Properly align the cartridge on the tonearm using a protractor tool to reduce tracking errors and minimize unnecessary vibrations.
Motor Isolation and Maintenance:
Don't let the motor be a source of trouble. Here's what you can do:
a. Motor Isolation: Check if your turntable has a motor suspension system that isolates it from the plinth. Make sure it's functioning correctly to reduce vibrations.
b. Motor Maintenance: Regularly lubricate the motor as recommended by the manufacturer to keep it running smoothly and quietly.
Anti-Vibration Accessories:
Take your sound quality to the next level with these additional accessories:
a. Turntable Isolation Platforms: Consider using a dedicated isolation platform or shelf designed specifically for turntables. These can significantly reduce vibrations from the environment.
b. Turntable Isolation Feet: Upgrade to high-quality isolation feet to isolate your turntable from external vibrations and enjoy a cleaner sound.
c. Turntable Custom Base: Enhance stability and isolation by investing in a heavy, layered base made of materials like MDF, solid wood, Acetal, or Delrin.
d. Isolation Foot Pads are very affordable and popular.
e. Wall Mounted Turntable Shelf Is Overall Best Solution:
Structural Stability:
Reduced Foot Traffic and External Vibrations:
Minimal Resonance:
Isolation from the Floor:
Utilizing these different solutions and tips will unlock the full potential of your analog turntable by eliminating vibrations and humming sounds. With proper placement, the right mats, balanced tonearm and cartridge setup, and anti-vibration accessories, you'll elevate your listening experience to new heights. Remember to experiment and fine-tune these solutions to suit your specific needs, and get ready to immerse yourself in the rich and authentic world of analog audio.
]]>It's all about marketing, promotion, and engagement. Check out these powerful strategies for getting game players to sign up for your game's Steam wishlist:
1. Create an irresistible game:
Make sure your game is top-notch, entertaining, and meets players' expectations. A killer game will naturally attract more interest.
2. Build a dedicated game hub:
Create a website or landing page specifically for your game. This is where all your promotional efforts will come together, and it should make it easy for users to wishlist your game on Steam.
3. Optimize your Steam store page:
Craft a store page that grabs attention and provides all the info players need. This is their landing spot when they click the "Add to wishlist" button.
4. Show off stunning visuals:
Use eye-catching screenshots, trailers, and artwork that showcase your game's features and uniqueness. Visuals are a key factor in attracting users.
5. Write an irresistible description:
Craft a detailed, compelling, and concise game description. Highlight what sets your game apart and why players should be thrilled about it.
6. Create hype before launch:
Build anticipation well before the release date. Teaser trailers, social media teasers, and sneak peeks can generate major excitement.
7. Leverage social media:
Build an active social media presence for your game on platforms like #screenshotsaturday on "X" (Twitter), Facebook, Instagram, and TikTok. Keep your audience updated and engage with them. Share gameplay video clips on all of these platforms.
8. Engage with your community:
Nurture a passionate and engaged community by interacting with your followers, answering questions, and showing appreciation for their support.
9. Offer enticing incentives:
Encourage users to wishlist your game by offering exclusive in-game items, early access, or discounts to those who do so.
10. Launch a mailing list:
Create an email newsletter or mailing list and encourage website visitors and social media followers to subscribe. Use it to send updates and remind them to wishlist.
11. Host game beta tests or demos:
If possible, offer a free demo or beta test. Let players experience your game and motivate them to wishlist it for future access.
12. Collaborate with influencers and streamers:
Partner with gaming influencers and streamers to play and promote your game. Their reach can introduce your game to a wider audience.
13. Participate in gaming communities:
Join facebook groups like Indie Game Showcase, indie game forums, subreddits, and Discord servers related to your game's genre. Engage in discussions and share updates when relevant.
14. Run contests and giveaways:
Host exciting contests or giveaways where participants can win game keys or exclusive items by wishlisting your game and sharing it on social media.
15. Attend gaming conventions and events:
Showcase your game at expos, conventions, or online events. These platforms provide a great opportunity to interact with potential wishlists.
16. Use targeted paid advertising:
Consider running ads on social media platforms and game-related websites to reach a wider audience interested in your game.
17. Monitor and adjust your strategy:
Continuously analyze the effectiveness of your promotion efforts. Use analytics tools to track conversions and adjust your strategy accordingly.
18. Launch a countdown campaign:
As your release date approaches, run a countdown campaign to remind potential players to wishlist the game and be notified of its launch.
19. Send reminder emails:
For those who have subscribed or shown interest, send reminder emails as the release date gets closer.
Remember, building wishlists takes time, so stay persistent. Engage with your audience, listen to feedback, and provide ongoing value to your community. The more genuine excitement and anticipation you generate, the more wishlists you'll gather on Steam.
• Mnpctech's hand crafted gaming PC case mods make perfect giveaways for growing your steam wishlist.
• Watching Mnpctech Crafting themed cases allows for creative and exciting ways to engage with the community.
• Utilizing these PC mods as giveaways is an effective way to grow your steam wishlist.
Look no further than Mnpctech's custom gaming PC mod! Contact Mnpctech for their revolutionary designs, they guarantee to take any standard game console and give it an incredible facelift that is sure to wow gamers from all walks of life. For the indie developer trying to establish an awesome presence in the PC arena or the AAA studio who wants heightened attention around launch week – this modification will do both and more! Get ready for your ultimate game reveal with Mnpctech’s “Elevate Game Release" service - because nobody does outrageous confidence quite like them.
Outer Worlds Custom Gaming PC Built For Giveaway Campaign by Mnpctech.
1. The Game Release Campaign Strategy
The goal of the game release campaign was to create a unique experience that would draw attention to the launch of our new game. To accomplish this, we partnered with Mnpctech, an industry leader in custom PC modding, to design and build a one-of-a-kind gaming PC mod inspired by our game. This project required careful planning and collaboration between both teams in order to make sure that all aspects of the project were completed on time and within budget.
2. Collaborating with Mnpctech
Mnpctech is an experienced team of modders who specialize in creating custom gaming PCs for their clients. We worked closely with them throughout the entire process, from concepting and designing the mod to building and showcasing it. They provided us with invaluable insight into the world of custom PC modding, as well as access to their extensive network of modders and influencers.
3. Designing the Custom PC Mod
Once we had established our partnership with Mnpctech, we began working together on designing the custom PC mod inspired by our game's theme and aesthetic. We chose components based on performance requirements as well as aesthetic considerations such as color scheme and lighting effects. We also decided to include a unique feature—a fully functional arcade cabinet—that would be used for showcasing the finished product at events and conventions.
4. Building the Masterpiece
Once we had finalized the design for the custom PC mod, we began building it using high-end components sourced from around the world. Every component was carefully chosen for its performance capabilities as well as its aesthetic appeal, ensuring that every aspect of the build was of top quality. The entire process took several weeks to complete but resulted in a truly stunning piece of art that exceeded all expectations.
5 Showcasing the Finished Mod
Once we had completed building the custom PC mod, we showcased it at various events and conventions across North America in order to generate buzz around our upcoming game launch. We also created promotional videos featuring gameplay footage from our game running on the custom PC mod, which further increased awareness about our game among gamers and tech enthusiasts alike.
6 The Giveaway Campaign
To further increase engagement with our audience, we launched an online giveaway campaign where users could enter for a chance to win their own copy of our game or even get their hands on an exclusive copy of the custom PC mod built by Mnpctech! This campaign proved to be incredibly successful in terms of user engagement and helped us reach a larger audience than ever before.
In conclusion, there’s no doubt that an Mnpctech Custom Gaming PC Mod will help attract more gamers and build your online community. Think about how great it would be to show off a handcrafted gaming PC Case Mod that accurately reflects the world of your favorite PC game? Your followers and potential new members will love viewing captivating photos and video clips on your social platforms showcasing the beauty and uniqueness behind your PC game Mnpctech Gaming PC build. And don't forget; you'll have our team of experienced builders at your disposal to help coordinate progress clips for maximum engagement with your followers. The bottom line is, if you are looking to boost the growth of your PC Game's online community, give away an Mnpctech Custom Gaming PC Mod!
Show what type of PC Game you have and Contact Mnpctech
]]>
Join game developers, including indie creators, in sharing the latest screenshots, GIFs, and videos from their works in facebook Indie Game Dev Groups and "X" (formally known as Twitter). Every Saturday, dive into the gaming world as participants use the #ScreenshotSaturday hashtag to unveil their creations.
This event is the perfect platform to exhibit your game, receive valuable feedback, and generate excitement among gamers. Showcase gameplay snippets, concept art, or captivating in-game scenes with a brief description to captivate the gaming community.
1. Boost Your Indie Video Game's Marketing with #ScreenshotSaturday
2. Increase Visibility: Get your game in front of a wide audience of gamers and enthusiasts on Twitter. Gain new followers and potential players by showcasing your game's content.
3. Drive Engagement: Join the active and involved gaming community on Twitter. Share updates and screenshots to encourage interactions like likes, retweets, and comments, expanding your game's reach through social sharing.
4. Build Connections: It's not just about promotion; #ScreenshotSaturday is an opportunity to engage with other developers, players, and enthusiasts. Connect, collaborate, and receive valuable feedback and support from the gaming community.
5. Highlight Progress: Regularly share screenshots to showcase your game's development journey. Let players and investors see the evolution of your game over time.
6. Collect Feedback: Gain invaluable insights, suggestions, and issue reports from the gaming community. Improve the quality of your game with their feedback and testing.
7. Generate Anticipation: Excite and entice players by consistently sharing visually captivating content. Build anticipation for your game's release and increase the likelihood of purchases and support.
8. Establish Your Brand: Consistently participating in #ScreenshotSaturday helps you create a strong online presence and establish a recognizable brand identity for your game.
9. Boost Discoverability: Make your posts more discoverable by using the #ScreenshotSaturday hashtag. Reach a wider audience of gamers searching for game content or following the hashtag.
10. Cost-Effective Marketing: Market your game without breaking the bank. Participate in #ScreenshotSaturday and gain exposure without the need for a hefty advertising budget.
11. Earn Recognition: Deliver high-quality and engaging content consistently, and your game may receive recognition within the gaming community. This can lead to positive press coverage and invitations to showcase at gaming events.
12. Remember to create visually stunning screenshots, use captivating captions, and engage with your audience. Consistency is crucial, and building a supportive community on Twitter is key to the success of your indie game's marketing efforts.
Ready to make your mark in the gaming world? Join Screenshot Saturday! It's easy: just post your captivating screenshot or media on a Saturday and use the #ScreenshotSaturday hashtag in your tweet. Connect with fellow developers and players, show appreciation for their creations, and amplify your presence in the gaming community on Twitter. Don't miss out on this golden opportunity to build interest in your own game and connect with like-minded enthusiasts.
ULTROS indie game by Hadoque in Sweden.
Marketing an indie game on a limited budget can be tough. But don't worry, there are still effective ways to spread the word about your game. It's all about slowly gaining exposure. Take a look at your calendar and find pockets of time to invest in marketing. To help you out, here are some highly efficient and affordable ways to market your indie game.
Social Media: Post video clips on platforms like X, (formally Twitter) on Satudays with hashtag #screenshotsaturday. Facebook, Instagram, and TikTok to create a presence for your game. Share development updates, behind-the-scenes content, and engage with your audience. Vertical video gameplay clips get the best engagement because they fill the screen on smartphones.
Create a Website or Landing Page: Build a simple website or landing page for your game. This can serve as a central hub for information, screenshots, trailers, and links to your social media profiles.
Email Marketing: Collect email addresses from interested gamers and potential fans. Send out newsletters with development updates, release announcements, and exclusive content.
Content Creation: Start a developer blog, YouTube channel, or Twitch stream to document your game's development journey. This can help you connect with an audience interested in your game's progress.
Indie Game Forums and Communities: Engage with communities on platforms like Reddit, IndieDB, TIGSource, and relevant subreddits. Be an active member, share your progress, and gather feedback.
Press Releases and Game Journals: Send press releases to indie game-focused websites and blogs. Some may cover your game if it's interesting and unique.
Beta Testing and Demos: Release a demo or beta version of your game on Steam to gather feedback and build anticipation.
Game Forums and Discord: Join gaming forums and Discord servers relevant to your genre. Engage in discussions and share your game when appropriate.
BZZZT Retro 8 Bit Metrovoidvania Inspired Game by Karel Matejka.
Influencer Outreach: Contact YouTube and Twitch gamers who cover indie games. Offer them a free copy of your game in exchange for a review or coverage.
Participate in Game Jams and Contests: Showcase your game in indie game competitions and online game jams. Winning or even participating can generate buzz.
Cross-Promotion: Partner with other indie game developers to cross-promote each other's games. This can help widen your reach.
Localized Marketing: Make and post posters with QR code for your Mobile game. If your game supports multiple languages, consider targeting specific regions with localized marketing efforts.
Free Platforms: Release a free version of your indie game on platforms like itch.io. This can help build a following and generate word-of-mouth.
Feedback and Iteration: Actively seek feedback from players and make improvements to your indie game based on their suggestions. Word-of-mouth can be a powerful marketing tool.
Community Building: Build a community around your game by interacting with players, hosting contests, and encouraging user-generated content. Discord and Facebook Groups are great platform communities to build your game's fanbase.
Crowdfunding: Consider platforms like Kickstarter or Indiegogo to fund your game and generate interest simultaneously.
Tim Hartman's Retro 8 Bit Indie Game, Project Blue.
Unlocking the secret to successful indie game marketing: consistent engagement, regular updates, and a dash of patience. Sure, they won't break the bank, but be prepared to invest time and effort. Remember, it's a marathon, not a sprint. Stay committed to growing your game's presence in the long run.
]]>Join Indie Game Dev Showcase Group
We're passionate about witnessing the progress of your indie game and hearing about its release. Within this new IGD Group, everyone is involved in creating, marketing, playing, publishing, and supporting Indie Games. Whether you're working remotely or seeking a position at an Indie Game Studio, we welcome job position openings from all Indie Game Studios worldwide. Share the development process of your latest indie game release or expansion update package. Our support extends to fellow Indie Game Developers and Studios, no matter where you're located. If you're new to the Indie Game Development Group, don't hesitate to seek advice on indie game marketing, publishing, or development. We understand that navigating the world of Indie Game Marketing and Indie Game Publishing can be overwhelming. People often struggle when deciding between releasing their games on EPIC Games or the Steam store. We also stay updated through the Indie Game Business Podcast and are fans of the annual Indie Game Dev events worldwide.
Join our dynamic community of indie game creators and players and showcase your indie game! Whether you're a developer, fan, or dedicated gamer, this group is designed just for you. Share your completed or ongoing indie game projects, exchange experiences, gain inspiration for future endeavors, and let's conquer the virtual world together! By fostering a positive and supportive environment, our Indie Game Dev & Studio Group will thrive.
We're thrilled to witness the progress of your indie games and learn about your game releases. Everyone in our new IGD Group is immersed in the creation, marketing, playing, publishing, and support of indie games. Whether you're looking for work-from-home opportunities or seeking positions at indie game studios in your area or abroad, we welcome job openings from indie game studios worldwide. You're also encouraged to share updates on your latest indie game releases or expansion packages. Regardless of your location, our community is here to support fellow indie game developers and studios.
If you're new to the Indie Game Development Group, don't hesitate to seek advice on indie game marketing, publishing, or development. These areas can be overwhelming, and we understand the need for guidance in deciding whether to release your games on EPIC Games or the Steam store. We're devoted listeners of the Indie Game Business Podcast and enthusiastic supporters of annual indie game dev events worldwide, especially the prestigious GDC/Game Developers Event in San Francisco.
Lease Office and Community Party Room for The Snelling Upper Post Flats.
Discover Upper Post Flats, an Affordable Housing Community with Income Restrictions. To qualify, please ensure that your household meets the following guidelines: a minimum household income requirement of 2.5 times the monthly rent amount. Your total household income must be UNDER the specified limits based on the number of occupants. Don't miss out on the chance to call Upper Post Flats your home, where affordability meets comfort and convenience.
Street on Northside of Lease Office and Community Center Party Room for The Snelling Upper Post Flats.
Income Limits based on Household Size:
- 1 Occupant: $52,200
- 2 Occupants: $59,640
- 3 Occupants: $67,080
- 4 Occupants: $74,520
- 5 Occupants: $80,520
- 6 Occupants: $86,460
- 7 Occupants: $92,460
- 8 Occupants: $98,400
The Comfy Community Center Party Room for The Snelling Upper Post Flats.
Discover the exceptional lifestyle at Upper Post Flats. Our community is dedicated to serving your every need, with comfortable interiors and resident-centered services. Experience the serenity of our outdoor swimming pool and green space, a tranquil retreat from the busy pace of everyday life. Stay fit and meet your daily needs at our on-site fitness center and community room.
Use The Catering Kitchen at Community Center Party Room for The Snelling Upper Post Flats.
Cool down in the Swimming Pool outside of the Community Center Party Room for The Snelling Upper Post Flats.
Located in the charming Historic Fort Snelling neighborhood, we are conveniently close to the Mall of America, Saint Thomas Ice Arena, and numerous other amazing attractions. Don't miss out on this extraordinary living experience.
What truly sets Upper Post Flats apart is our unique buildings offering a variety of floor plans. Nestled in the Historic Fort Snelling neighborhood, we are conveniently located near the Mall of America, Saint Thomas Ice Arena, and an array of amazing attractions. Don't miss out on this extraordinary living experience.
Choose from carefully crafted studio, 1, 2, 3, and 4 bedroom floor plans, designed to provide comfort and space for everyone. Inside each apartment, enjoy the open and spacious layout, featuring original hardwood floors, exposed brick, and convenient walk-in closets.
Experience luxury living at Upper Post Flats Apartments and Housing. Our community is committed to providing exceptional service and comfort. Enjoy our serene outdoor swimming pool and green space, perfect for escaping the hustle and bustle of everyday life. Stay active and meet your needs at our on-site fitness center and community room.
Choose from a range of beautifully restored apartments in studios, 1, 2, 3, and 4 bedroom floor plans. Each apartment offers a spacious layout with original hardwood floors, exposed brick, and walk-in closets.
What sets Upper Post Flats apart is our unique historic buildings and diverse floor plans. Located in the Historic Fort Snelling neighborhood, we are conveniently close to the Mall of America, Saint Thomas Ice Arena, and other exciting attractions. Don't miss out on this extraordinary living experience.
Minnesota fall and winters can be very cold, good thing the Upper Post Flats offer housing for your vehcile as well. Experience the exceptional lifestyle at Upper Post Flats Apartments and Housing. Our community is committed to meeting all your needs, providing comfortable interiors and resident-centered services. Relax by our outdoor swimming pool and green space, a peaceful oasis from the hustle and bustle of everyday life. Stay active and fulfill your daily requirements at our on-site fitness center and community room.
We love the center island in the kitchen for preparing meals with the pre-installed appliances that include Microwave and traditional stove. Choose from a range of beautifully restored studios, 1, 2, 3, and 4 bedroom floor plans, designed to offer comfort and space for everyone. Inside each apartment, you'll find an open and spacious layout, featuring original hardwood floors, exposed brick, and convenient walk-in closets.
What sets Upper Post Flats apart is the unique historic buildings that offer a variety of floor plans. Located in the charming Historic Fort Snelling neighborhood, we are conveniently close to the Mall of America, Saint Thomas Ice Arena, and numerous other amazing attractions. Don't miss out on this extraordinary living experience.
The fireplace was covered to prevent any potential fires or unsafe incidents. This also costs down on upkeep costs and need for storing firewood.
What sets Upper Post Flats apart is the unique historic buildings that offer a variety of floor plans. Here is the included batroom counter sink.
View of steps and storage room in the basement of House on Taylor Ave at the Fort Snelling Upper Flats Home.
Walk around the lower basement level living space in one of the restored houses on Taylor Ave.
Look at forced air furnace and central air cooling unit in Upper Post Flats Home.
Converted Firehuose Station Home In The Upper Flats Fort Snelling.
Experience the convenience and savings of Fort Snelling Apartments' new Gym & Fitness Center. Stay active, healthy, and save both time and money by renting an apartment with an on-site fitness center. With nearly 82% of Upper Post Flats apartment buildings offering this amenity, finding the perfect place is a breeze. Our state-of-the-art fitness centers are equipped with everything you need, from free weights to treadmills, ellipticals to rowing machines, and exercise bikes. Take advantage of additional perks like classes and personal trainers, all conveniently located within your building. Enjoy access to the fitness center during regular business hours or 24/7, depending on the location. Say goodbye to crowded gyms and hello to a more convenient way of staying fit. Choose Fort Snelling Apartments with a Gym & Fitness Center.
]]>Don't waste your time searching for the right epoxy for your Snark sailboat repair - btw, it's this Original Gorilla Glue that you mix with bits of styrofoam to repair your Snark hull. Don't waste your time trying to find out which 2-part epoxy to use. We found a faster and better solution with Expandable Spray Foam Filler.
Say goodbye to holes and chips as we walk you through the step-by-step process of fixing your Snark sailboat hull with Spray Filler. This guide is applicable to various Snark sailboat models, including the Snark, Sea Snark, Super Snark, Snark Sundancer, Snark Fireflower, Snark Sunflower, and Sunchaser I and II.
The Snark Sundancer Sailboat was discontinued from production in 1983.
Several hundred people each year buy a used Snark sailboat and face the dilemma of how to repair the styrofoam hull with ABS polymer shell. This Do-It-Youself guide can be used on any Snark sailboat with the ABS polymer shell and styrofoam hull.
Close look at the gouge in the bow of our Snark sailboat. We're going to fill gouge with spray foam filler, then cover the ABS polymer outter shell with fiberglass.
Buy Great Stuff Gaps & Cracks Expandable Foam Spray to fill and repair any cracks and holes in your Snark Sailboat Hull.
The Great Stuff Gap & Cracks Filler can comes with detachable long nozzle. Just insert nozzle in the hole or chip in your Snark sailboat. This filler foam expands as it cures, so you only need little squirts. Practice on scrap of cardboard or paper so you get a feel for how much foam to apply.
Use piece of cardboard to remove access foam and smooth over the Spray Filler Foam as it expands while curing. This cure time can take 20 - 30 minutes
After the foam has cured, estimate 20 - 30 minutes, we use a hacksaw blade to remove the excess foam.
Cured foam after using hacksaw blade to remove excess filler foam in the Snark sailboat hull. This process is much faster and easier than mixing original Gorilla Glue with bits of styrofoam.
After foam has cured, use 80 grit sanding block or sand paper to smooth over the cured spray foam. If your hull is styofoam only, you don't have to do anything else from this point!
Buy BONDO Fiberglass Resin Repair Kit
Cured Bondo Fiberglass.
Now we're ready to get our Snark Sailboat back on the water and go sailing!
Learn how to easily repair the styrofoam hull of your Snark sailboat with this comprehensive guide. No need to waste time and money on expensive epoxy. Use this step-by-step instruction guide on how to fill holes and fix chips in your Snark sailboat hull. This guide is suitable for all Snark sailboat models with styrofoam hull including Snark, Sea Snark, Super Snark, Snark Sundancer, Snark Fireflower, Snark Sunflower, and Sunchaser I and II sailboats. Don't let a damaged hull ruin your sailing experience - get your boat back in top shape today.
Discover the ultimate solution for repairing your Snark sailboat hull! This comprehensive guide is specifically designed for Snark sailboats with an ABS polymer shell and styrofoam hull. Forget about searching for the right epoxy or glue - we have the answer you've been looking for. Say goodbye to expensive two-part epoxy and say hello to the perfect Gorilla Glue for your Snark sailboat hull repair. Not only will we show you how to fix holes and chips in your hull, but we'll also reveal the best epoxy and glue options for all Snark sailboat models - including the Snark, Sea Snark, Super Snark, Snark Sundancer, Snark Fireflower, Snark Sunflower, and Sunchaser I and II. Don't miss out on this step-by-step instructional guide that will transform your sailboat repair process.
]]>When we learned that Modern Masters Iron Paint had been out of stock for months without any update from the manufacturer (Rustoleum), we searched for an alternate substitute. We needed an Iron surface paint so we could use our bottle of Modern Masters Rust Activator for our client's project.
This is Sophisticated Finishes Iron Metallic Surfacer applied over Modern Masters Primer. You can use Modern Masters Rust Activator over Sophisticated Finishes Iron Metallic Surfacer.
Splattering on Modern Masters Rust Activator over Sophisticated Finishes Iron Metallic Surfacer.
Modern Masters Rust Activator works on Sophisticated Finishes Iron Metallic Surfacer as Substitute.
Modern Masters Iron Paint Instructions are the same as Sophisticated Finishes Iron Metallic Surfacer. Just apply Sophisticated Finishes Iron Metallic Surfacer over a cost of Modern Masters Surface primer. We were happy to discover that Modern Masters Iron Paint can be replaced by Sophisticated Finishes Iron Metallic Surfacer as Substitute.
Use Sophisticated Finishes Iron Metallic Surfacer as replacement and or alternative fix when using Modern Masters Metal Effects Oxidizing Iron Paint. Let us know in comments if you have found your own alternative solution to Modern Masters Iron Paint for your own hobbies and projects.
The year was 2045, and the world of painting had been forever changed by the debut of Modern Masters Iron Paint. The instructions were simple—just apply a coat of Modern Masters Surface Primer over any surface desired to be painted, followed by an application of the revolutionary iron paint. Its results were nothing short of astounding; with its unique blend of durable pigments and polymers it created a sleek metallic finish that lasted for years without fading or chipping away.
Unfortunately, due to its expensive ingredients and meticulous production process, not everyone could afford to use this revolutionary product. That’s when two brilliant minds decided to take matters into their own hands: they developed Sophisticated Finishes Iron Metallic Surfacer as a substitute for Modern Masters Iron Paint! It was simpler in composition but still achieved the same beautiful metallic finish – all at a fraction of the cost.
Word quickly spread about this new alternative and soon enough people from all corners began utilizing both products together: applying Sophisticated Finishes Iron Metallic Surfacer over a coat of Modern Masters Surface primer produced stunning results that satisfied even the most discerning customers! This combination ultimately revolutionized painting technology on a global scale; what started out as two ambitious individuals trying something new ended up becoming an industry-wide phenomenon that allowed more people access to luxurious finishes than ever before.
The trick had been passed down through generations of the family. They would take a coat of Modern Masters Iron Paint, apply it to their surfaces, and end up with a beautiful finish that was sure to last for years. Unfortunately, as time went on, they found that the paint was becoming harder and harder to find.
One day, while doing some research online, they stumbled across something quite remarkable: Sophisticated Finishes Iron Metallic Surfacer could be used in place of the old iron paint! It wasn't exactly the same - there were some nuances between them - but it seemed like an adequate substitute.
The family couldn't believe their luck and eagerly set about painting all their surfaces with the new surfacer instead of using modern masters iron paint. The results were even better than expected; not only did it look just as good as before but it also lasted much longer too!
This discovery gave new life to old projects around the house which had been neglected due to lack of available paint supplies over time. Thanks to this simple substitution technique everyone in the family now has access to beautiful finishes without worrying about running out of materials anytime soon!
Intel ARC Alchemist Steampunk theme game PC Mod for giveway.
Mnpctech specializes in creating custom gaming PCs inspired by the environment of your game. Bill Owen is one of their top influencers and he has a large fan following on social media platforms like Instagram, Twitter, YouTube, and Twitch. His unique builds often feature hardware from leading companies such as Intel, Asus, Nvidia, Corsair, and more. By working with Bill to create a custom mod based on your game's theme, you can excite fans and followers while also giving away prizes that will have them clamoring for more information about your upcoming release date or wishlist.
Not only do these custom builds help generate excitement around your upcoming release date or wishlist—they also give you an edge when it comes to getting noticed on social media platforms like Twitch or YouTube. Players love seeing these customized rigs in action as they fight their way through virtual worlds or challenge each other online in popular games such as League of Legends or Overwatch. And since Mnpctech is able to build these custom rigs quickly, you won't have to wait too long before you can start using them in streaming sessions or giveaway campaigns.
Mnpctech is also experienced when it comes to working with developers from all over the world—including those based in China, Japan, Korea, Ukraine, Poland or Russia—so no matter where your development team is located they will be able to help bring your vision for a customized rig to life. Plus they offer competitive prices so budgeting won't be an issue either!
Contact team at Mnpctech is ready and willing to work with developers from any country around the world who want to use custom gaming PCs as part of their launch strategy for their PC game release date or wishlist campaign. With Bill Owen's influence behind them and his significant fan base on social media platforms like Instagram and Twitch, Mnpctech's PC builds are sure to capture the attention of gamers everywhere—and get them excited for what's coming next! So if you're looking for a way to give your upcoming game launch a boost on social media platforms then definitely consider hiring Mnpctech for some awesome custom rigs inspired by the world of your PC game!
Join Mnpctech HYTE Y40 & Y60 Case Owners Group on Facebook.
We start with two HYTE y60 pc BUILDS BY our friends at LiquidHaus.
"The gritty and vibrant aspects of the Cyberpunk aesthetic is something that we’ll always enjoy doing. Nothing related to the game itself which shares the namesake, the aesthetic and atmosphere is a lot of fun to recreate in a PC!"
"Project Y60 is our second project with Hyte, this time with their brand new Y60 case. People are already starting to dub it the new 011, and we can definitely see why!" - LiquidHaus
Join Mnpctech HYTE Y40 & Y60 Case Owners Group on Facebook.
Justin Case's HYTE Y60 PC build with custom HDMI vertical LCD. Join and post your HYTE PC builds in HYTE Y40 & Y60 Case Owners Group on Facebook.
Awesome RGB HYTE Y60 PC build by darkmatrixzero. Show us your HYTE PC builds in the HYTE Y40 & Y60 Case Owners Group on Facebook.
Red & White HYTE Y60 PC build by tom9676 with vertical MSI GPU. Show off your HYTE PC builds in the HYTE Y40 & Y60 Case Owners Group on Facebook.
Aschwin van der Elst built this amazing HYTE 60 PC. He's using nine Lian Li RGB cooling fans. The HYTE Y60 PC build is your perfect case for displaying 3D printed figures. Show me your HYTE PC builds in the HYTE Y40 & Y60 Case Owners Group on Facebook.
Topmaststicky's HYTE T60 custom PC build with vertical LCD in front. Show me your HYTE PC builds in the HYTE Y40 & Y60 Case Owners Group on Facebook.
]]>
Watch How To Mod Your PC With This Fallout 25th Anniversary TV Show Release PC Case Mod Theme In The Youtube Videos Published below.
Watch this tutorial how to guide on painting your PC Case mod with the fallout Blue & Yellow colors using Montana Gold Magic Blue & Easter Yellow.
PC Case Modding Fans of Mnpctech's PC Modder, Bill Owen asked him for new PC case mod project to watch every stage of the PC Mod unfold before your eyes. This Fallout TV Show Anniversary PC case mod is off of Bill's bucket list! He is using the Corsair 400R midtower case Bill designed for Corsair's Headquarters in California in 2009. The commissioned PC Case design job paid twenty nine thousand dollars. Then later that next year, Corsair asked Mnpctech to mod the Corsair 400R for CES in Las Vegas. The Fallout 76 TV Show theme was requested by client who planned to give the Fallout PC as surprise gift. It's already shaping up to become one of Bill Owen / Mnpctech's most famous and timeless PC Case Mods of all time. In Part 1 of Mnpctech's Fallout PC Mod, Bill Owen shares the "Fallout Vault-Tec" concept art for this case mod created by Mnpctech. updating the front I/O panel in the Corsair 400R with I/O panel from the new Corsair 5000 case. I share our first "Hardware Drop" from Ukraine. It's going to host an authentic Nixie Clock from Russia that will reside in the 5.25 bay. I feature the stages in cutting a custom window in the Corsair mid tower case and making the acrylic clear window. Part 1 of the Fallout PC Mod video moves onto a 2nd "Hardware Drop" that shows the ASUS Z690-A PRIME motherboard for our Intel 12900K cpu. Always keep in mind that PC game publishers can hire Bill Owen from Mnpctech to create a jaw dropping gaming PC Mod to promote their new PC game release as giveaway. Gaming PC giveaways are great method for PC game publishers to get the word out about their PC game over social media.
Bill Owen has over 20 years experience in modding gaming PC cases for gaming events and marketing new PC games through giveaway campaigns on social media platforms.
Here is the otherside of the Corsair PC case used for the Fallout Anniversary theme Gaming PC Mod Giveaway by Mnpctech. This PC Case Modding Series was on PC Modder. Bill Owen's Bucket list of PC Case Mod themes.
Mnpctech's Bill Owen is using the Corsair 400R mid tower case I designed for the case company in 2009. In this video update you see two "Hardware Drops" that reveal Bill Owen's favorite choice of PC data storage by CRUCIAL MEMORY and the popular EVGA FTW RTX 3090 TI gaming gpu. You can find these EVGA RTX 3090Ti gpu's currently on the market are priced from $1000 New In Box on Ebay to $1699 on various retail PC hardware online stores. You too, like many PC game publishers and indie game developers can hire Bill Owen from Mnpctech to create an insane and jaw dropping gaming PC Case Mod to promote your upcoming PC game release. Mnpctech's founder, Bill Owen has 20+ years experience in PC modding and building crazy gaming PC's for gaming events like Twitchcon, PAX, Computex and CES in Las Vegas marketing campaigns on Social Media.
Look closer and see the Nuka-Cola logo inside this Corsair Fallout Case Mod.
Here's the rear view of the new Corsair PC case mod with Vault Boy holding Nuka-Cola on back of this Corsair Fallout Case Mod.
In Part 3 update of my tribute to "Fallout Vault-Tec" with this mnpctech Gaming PC build and PC case mod project. Thank you for watching every stage of this PC Mod unfold here on Youtube. I'm Bill Owen, I've owned Mnpctech since 2001. This "fallout" theme PC case mod is one from my bucket list of PC Mods! You can see my other top ten bucket list PC mod builds pinned at the top of Part 2 video for my fallout PC Case Modding project series. Watching Part 3 of Bill Owen's Fallout Gaming PC Case Mod series shares his tutorial on "how to" guide on painting your own PC Case mod with the popular fallout Blue & Yellow colors using Montana Gold Magic Blue & Easter Yellow. Bill Owen is using the Corsair 400R mid tower case he designed for Corsair in 2009. The job paid $29,000 and the Corsair 400R case went on to recieive Newegg's Golden Egg award on it's release year. Later in 2010, Corsair asked Bill Owen to mod the Corsair 400R for CES Show and Display in Las Vegas. In this update 3rd installment video of my "Fallout Vault-Tec" theme Gaming PC build, you learn how Bill Owen rattle . spray bombed canned the paint this Corsair PC / Computer case. Bill also guides you through the surface preparation of painting the PC chassis and exterior steel and plastic PC case panels. You can hire Bill Owen from Mnpctech to create a jaw dropping gaming PC Mod to promote your PC hardware or new PC game release on EPIC GAMES or the STEAM store. Bill Owen has over 20 years experience in modding PC cases for PC gaming events and marketing campaigns on Social Media.
Closer look at the graphic of the "Vault-Tec Boy" on the right side panel of the Corsair 400R computer case. This graphic will be detailed further with weathering and distressing to reflect being left outside in several acid rain storms.
The old school PC fan controller from Pentium III era has been detailed with custom paint F/X to reflect usage over many, many years.
Close up look at the Mnpctech custom pc fan grill of fallout 25th anniversary vault-tec door design for 120mm cooling RGB fan by Corsair. It's been weathered with wasteland rusted patina paint effects with airbrush kit off amazon.
Final results on the Corsair 400R left aider access panel with custom Vault-Tec vault door inspired 120mm computer cooling fan grills.
]]>
In September of 2022 our Internet service with Centurylink in South Minneapolis became intorable. We had to power down and reset Centruylink's modem twice a day. 6:30am - 10:30am was typically the worst time of the day for getting a solid internet connection with Centurylink. We spoke to our neighbors on Centrylink and they echoed our complaints. Centurylink was aware their bandwidth for their 40 mbps service was being overwhelmed by customers on our block. Centurylink's tech support solution was to purchase their new modem for $200 or upgrade our service to their top tier option for $80. It was this moment that I decided to order Fiber Optic with US Internet / USI. I knew it would be 1 - 3 week window of waiting for all of the installation stages with US Internet Fiber Optic Installation. I can suffer with Centurylink for this period knowing I would have the very best internet service available in Minneapolis once it's live.
Stage 1 of our USI Fiber Optic Installation was performed as scheduled. This involved determing where the USI Fiber Optic wire will be underground starting from boulavard and resurfacing 4 feet from side of our house. US Internet Tech plants flags for the routing of the Fiber Optic line from the street.
US Internet Fiber Optic Service Box for Wire Connection Mounted on House.
Before the Service box was installed on the house, I had escorted the USI Fiber Optic Technician into our basement to deteremine where he would drill small hole in the cement foundation. The USI Fiber Optic Technician inserted waterproof epoxy into the hole for the line, to prevent water or inserts getting in the house.
USI Fiber Optic Tech left the hardware for our connection. He connected Fiber Optic Ethernet Switch to the box he mounted on side of the house. He stated "Be careful not to bend the Fiber Optic cable more than 90 degrees when routing or handling it" The Fiber Optic Ethernet Switch brand and model used by US Internet is this CTC Union GSW 1005MS that retails for $139.99. You can find them used on Ebay.
He also gave us two TP-Link Deco X60 Wifi Mesh Routers for US Internet's "Gig Wireless Experience" which is additional $10 per month for rental fee. These transmit the wireless gigabyte signal with 2,000 sq foot spread, so you have good coverage throughout your home. US Internet's website description of this "Gig Experience" rental equipment in their shopping cart is pretty vague. I had to call US Internet to ask what exactly was covered with their $10 rental fee.
TP-Link Deco X60 Wifi Mesh Routers from US Internet sell for $199.95 in 3-Pack on Amazon. He said we connect everything to the Modem after the line is connected outside the house. He will text the user name and password.
We are now having to power off and on the Modem three times a day. I said eariler that I did speak with Centurylink Tech Suppprt and their only solution was buying or renting their new modem for $200 or leveling up on our service plan. My neighboors who use centurylink are pissed too, This annoyance with Centurylink is challenging my patience in anticipation of USI Fiber Installation being completed. At this point, I have to admit I'm a bit annoyed by waiting for all of these installation stages for USI's Fiber Optic service.
At 5pm I recieved an email that "Step 4 of 5" of my USI Fiber installation stages for USI Fiber Optic service were performed. This involved connecting the fiber optic wire to the house, so my modem was connected. They also filled the hole on the boulevard with dirt. "Where did US Internet get that extra dirt from?" I was annoyed that they didn't give me advance notice that they were coming to perform these tasks. I had questions for the USI Fiber Optic Technician.
At 3:59pm I received email update from US Internet that my service was live. I was at my studio working on the fallout tribute PC case mod. I got home at 7:30pm to get my other Desktop PC's connected to US Internet. I have PC network hardware and diagram below showing how you can connect multiple PC's to your USI Fiber Optic connection.
Buy This TP-LINK TL-SG105 / 5 Gigabyte Ethernet Switch
Buy This RJ45 Cat 6 Male to male Ethernet Patch Cable
Here is the proper way to setup home network when using USI Fiber Optic / US Internet connection along with their "Gigabyte Experience" Wifi Routers in your home.
My Windows 10 Desktop PC would drop or hiccup while surfing the internet with USI Fiber Internet. I would intermittently loose connection to my US Internet USI Fiber service. I did some research and it lead to my embedded NIC (Network Card) in my PC's motherboard being the problem.
I researched the best PC network card for Fiber Optic internet service and arrived at this TP-Link TX401 10Gb Ten Gigabyte Network card. After installing this network card into my PC's motherboard and installing these TP-Link TX401 drivers, I haven't experienced anymore drops.
On 9/26/22, I wanted to re-familarize myself with my service details for this blog. I tried to log into my account on USI Internet's website and it refused to let me log in. I tried password recovery and it responded that my email address was no longer associated with them. I contaced their custom service and got response within 30 minutes.
Hello Bill,
You will need the account number and the invoice number to access the online portal. You will have to wait until the service goes live and you get your first invoice.
Stacia R.
Customer Service
"I understand what you're saying, but I don't understand how you don't allow customers to view their account, even before the service is live. I've paid for 1st month of service, your technician drilled a hole in my foundation and left your modem and routers here. I understand your reasoning, but as a customer, who's paid already, this system is seriously flawed. I just want to view my account."
I do apologize. Our authentication process does require an invoice number. You have not been charged nor have paid anything at all yet. We do not charge for installation and you are not charged anything until your service goes live. Once the service goes live an invoice will generate. Then you can finish the process of attaching your account to the online profile. I apologize for any inconvenience. If there's anything else we can help you with, please don't hesitate to reach out.
Stacia R.
Customer Service
]]>I noticed that our email account with Yahoo Small Business was becoming very slow in loading and would lose connection. Especially in the mornings between 8:30am and 10:30am, which is peak traffic. I've had to struggle to simply type out an email on Monday. The connection kept dropping. I was suspecting it was our Internet service provider, but yesterday we updated our internet to USI Fiber Optic. Everything on the internet loads quickly, EXCEPT our Yahoo Small Business Email webpage. This validates that Turbify's Email / Domain Hosting Servers are tiny compared to Yahoo. I will assure you that Turbify won't be expanding their bandwidth to better serve those still using Yahoo Small Business email. It's time to leave the Yahoo Small Business Email platform before it gets worse.
]]>
I started writing this page on 7/3/22. It will be updated periodically. Join my Lockley Newport sailboat Group for answers to your sailboat questions.
The Newport 17 Sailboat was manufactured from 1974 to 1980. It weighs 800 pounds. Waterline length, 16.17 ft (0%), the closest to 15 ft ; Maximum draft, 4.75 ft ; Ballast, 235 lbs ; Hull speed, 5.39 knots.
The N17 is basically the Dodge Aries "K" car of sailboats. Just like Dodge, Lockley Newport made the N17 with the basic essentials to keep the retail price affordable. This is why they're cheap to buy used today, which is appealing to 1st time sailboat buyers. You learn why it was cheap after you've sailed on other boats. It lacks a lot of refinements, but it's a great sailboat for entering the hobby. I've had my Newport 17 for three years and learned a lot about it's best and worst attributes.
The fiberglass hull and top cover is very strong. I'm 195 pounds and stand on the 48 year old top cover often without any cracking. I haven't met anyone in the Lockley / Newport Boats FB group who's had to repair a hole in their Newport 17 hull. My first sailboat was a Surprise by the same manufacturer. It had been dropped on concrete by accident without any damage. Lockley / Newport Boats are like tanks.
I'm 6ft 3' and can fully lay down on either starboard or port side in the Newport 17 cuddy. There is 13.25" diameter molded recess for portable toilet, under the forward berth, but finding toilet that will fit can be challenging.
Newport 17 molded recess for Portable Toilet. Samuel Klein posted these photos on how he modified the recess to fit this HASSOCK Portable Toilet.
This is likely the reason why you're considering buying a Newport 17. It still looks good! The design has aged nicely over the past four decades. I'm often told my Newport 17 is beautiful and they're surprised when I tell them I paid only $600 for it with trailer.
Everything is simple on this sailboat with only the essential rigging. After you get more accustomed to sailing the Newport 17, you can add whatever refinements to the rigging you want. It's great blank canvas for DIYer's to add and tweak things.
Lockley Newport Boats was a small family operated manufacturer. Rigging is Rigging. You can buy universal parts or adopt rigging from any other sailboats brands / models. The only factory specification replacement part you can buy for Newport 17 is the mast made and sold by DWYER MAST. You can buy aftermarket updated Newport 17 rudder design by Rudder Craft. The cuddy covers, deck rails, tiller, centerboard and any other mechanicals you'll have to fabricate yourself or repair.
The Newport 17 centerboard keel tucks inside the hull. You raise and lower the centerboard with a line in the center of the deck. The line is held in place with a cleat. This line attaches to a retracting reel under the deck.
You can see the reel if you look under the floor from the cuddy.
Here's a photo by Richard Smith of the Winch and reel Assembly removed.
If your Lockley / Newport Boats Newport 17 centerboard line breaks, you need to either raise the boat or tip it on it's side to access the centerboard. You feed new centerboard line from the cabin attached to a wire (watch video) and attach new centerboard from the bottom of boat.
If you get late 70's Newport 17, the centerboard has updated hank crank with access cover from the cabin for repairs. (Pictured above)
This video guide shows you how to replace centerboard line on most sailboats including the Newport 17.
This is the direction 3/8" diameter line in your Newport 17 mainsheet halyard line. Notice end of the line is attached to block at top of photo. It has halyard line eye splice, but you can tie your own knot instead if necessary. I like this Double Braid Polyester Sailing Line Rope for my sailboats and will tie my own knot. Otherwise Castobargains makes halyard lines with an eye splice for your Newport 17 Traveler.
Another common issue is over time Newport 17's centerboard develops corrosion causing it to stick inside the hull. We moor our Newport 17 on a lake with seasonal algae that builds up on the keel causing it to stick. If you've just launched your sailboat and the centerboard won't lower, let the boat sit in the water for a day or two and the water may break centerboard loose. If soaking doesn't work, you need to get the boat raised so you can pull out the centerboard and clean it's surface. I've seen people raise their sailboats with jack stands and lumber beams, two engine lifts, or use a tractor with nylon tow straps tied to the shovel to raise the boat. If you don't have these options, take the boat to a Marina with a repair shop and boat lift.
Dimensions of Lockley Newport 17 sailboat Centerboard & Keel taken by Dan Shaver. Left click to save and view larger photo of this image offline.
Under power of motor (sails down) or sleeping at night, You need one white light on the stern and one white light on top of your masthead and bi-color green and red light on your bow.
Under sail power at night, you need white light on the stern and tri-color white on top of masthead and bi-color green and red light on your bow.
See more details on Navigation Light Rules.
Newport 17's factory mainsheet doesn't allow reefing. This allows you to shorten the mainsheet in high winds. Getting caught in 16+ knots with 24+ wind gusts will get scary under a full sail. You can buy new mainsheet that allows reefing. I ordered my mainsheet for the Newport 17 with reefing points for $675.
A Boom Vang pulls the boom downward and removes the slack from your mainsheet. I bought this Boom Vang for my Newport 17.
Not crucial, but very helpful for Solo sailing. Avoid your jib sail lines flopping around in the wind like two angry snakes on your deck.
Only crucial if you're sailing with aftermarket loose foot mainsheet. It allows you to adjust the position of the mainsheet along the boom on low wind days. You can easily make your own Outhaul with one block and a cleat.
Topping lift is a line that runs from the top of your mast to the end of your boom. Without a topping lift, your boom will drop onto the floor or your foot when lower your mainsheet. Not having one will become annoying and it's usually first thing people add. I recommend adding shackle to your boom, so you disconnect the Topping Lift while sailing, otherwise it may obstruct your mainsheet.
Lockley Newport Boats saves money on using marine grade wood for their rudders. If you moor your sailboat on a lake, you need to preserve the life of your rudder and remove it or tip back out of the water when not sailing. People have used fiberglass to repair their cracked rudders.
Over time the wood used for the three cuddy cover planks will warp, causing rain to leak inside the boat. Many people make rain shields.
Suzuki's 2.5hp model DF2.5L2 outboard motor is popular choice in our Newport 17 Sailboat group. It's a perfect choice for any sailboat that is 22' and smaller. At only 31 lbs, it's the lightest 4-stroke Suzuki long shaft model outboard ever built.
You need a motor for several reasons on a sailboat. Maneuvering your boat to and from the boat launch. Back and forth to a mooring buoy and when you need to avoid catastrophes from happening like running into trees or rocks. Many people use gas outboard motors up to 5 hp. We sail our Newport 17 sailboat on a city lake that doesn't allow gas motors.
This Minn Kota C2 30 lb Thrust Trolling Motor will get two adults back to shore with 16 knot head wind under full charge. If you predict sailing with four adults, invest in the Minn Kota 55-lb Thrust.
I use this Mighty Max 12 volt battery in this battery box & power center mounted to floor inside the cuddy. I'm using this Trolling Motor Extension cable Kit that runs under crew bench seat.
The battery is charged with this 12V Sunar Solar Panel mounted on top of porthole on the stern.
Before I tell you everything that myself and my Newport 17 friends hate about it, let's remind ourselves it was sold as an “entry level” sailboat. Reasonably priced to get families on the water without breaking the bank. This is why you see Newport 17's selling cheaper than same size sailboats. Unless the dealer or previous owners added aftermarket parts, it lacks a lot of features and rigging. Many Newport 17 owners are DIYers like myself that have added these refinements on low budgets.
Any sailboat can capsize with an inexperienced Captain. You simply don't sail in wind speeds beyond your skill level on any sailboat. The Newport 17 is 700 pounds with a small keel. It's sails like a Hippo on a Unicycle in high winds. The Newport 17 factory mainsheet doesn't allow reefing. Getting caught in 16+ knots with 24+ wind gusts in Newport 17 under full sail is scary. A high wind can push you over if you don't release your mainsheet! The individual who owns the capsized Newport 17 in above photo was inexperienced. If they could have reefed their mainsheet, this accident may have been avoided.
Add floatation device to the top of your mast. Two or three milk jugs will work. If you don't have mast floatation when you capsize, you can loop a children's bouncy ball around the mast and drag it to the top to lift the sunken last. Then pull up the centerboard and have somebody tow your boat to shore, so you can bail out the cuddy.
Read about our experience ordering new sails for your Newport 17 sailboat.
Order this Replacement Drain plug for Newport 17 by Seasense on Amazon.
These clam cleats will replace factory 1/4 Traveler line cleats on the Newport 17. You can reuse factory screws to mount these new cleats. Factory cleats had worn out from years of usage and lost their bite. No more tying knots!
We use this Boat Mooring Pennant for our Newport 17 sailboat for the past three years. It's got Zinc plated heavy duty spring shackles. Our lake winds are constantly shifting and there's been no wear and tear on this heavy duty Mooring line.
COMPAC 16.
PRECISION 17.
Montgomery 19.
Balboa 20.
Catalina 22.
Learn and Practice Tying Nautical Knots with this Hitch Cleat Kit Great for teaching kids how to tie the sailboat to the dock or your mooring buoy.
My Corsair icue 5000T build will stand out further from the crowd by utilizing stainless steel hard line tubing for water cooling the Intel - Core i9-12900K Desktop Processor. I chose this type of tubing because it's bright metallic finish is aesthetically pleasing. It doesn't absorb dirt, smudges, fingerprints or scuffs, making maintenance very easy. The biggest advantage to using stainless for PC water cooling is it's corrosion resistant properties, so you can use distilled water in your water cooling loop. It also resists bacteria and germs making it ideal choice for hygiene-conscious environments, hospitals and medical care centers.
I recommend the 600 series bender by Rigid Tool, or Imperial brand tube benders, these are the lowest cost.
Type of stainless tubing I'm using for PC water cooling is T-304/304L, Seamless Tube in 0.5" x 0.035" x 0.43"
Tools & Supplies Used in this Guide:
*RIGID 600 Series Tubing Bender
*Table Vise with Terry Cloth towel, to avoid scratching tubing.
*Micro Hand File
*Hacksaw with Bi-Metal Cutting Blade
*Table top grinder
*50 grit sand paper
Painting and weathering Cyberpunk era decals.
Custom painted cooling heat sinks and shrouds on the ASUS Strix z690 Prime INTEL 1700 motherboard for the Corsair 5000T Custom Gaming PC build.
Corsair Hydro X Series XG7 RGB 30-SERIES REFERENCE GPU Water Block (3090, 3080 Ti, 3080) with custom #retrofuturism #cassettefuturism mods and paint by Mnpctech.
Pictured above was the progress stage of the Corsair 5000T Gaming PC build on 6/13/22. You can watch overview video of the case mod made by Bill Owen. Bill had been busy with other client PC builds for marketing new PC game releases at the time.
Next stage planned was how to route out the liquid cool tubing and hoses inside the Corsair iCue RGB 5000T build and case mod for display.
Corsair 5000T Custom water cooled PC Build & Case Mod by Mnpctech
Here are the Hardware Specifications Intel Core i9 12900K. Asus Z690 Prime Motherboard, 32GB Corsair Dominator DDR5, ASUS ROG 3070Ti with Corsair Hydro GPU Water block. Corsair 850W PSU. Corsair 2TB M.2 Drive, 2x Corsair 360mm PC water cooling Radiators. Corsair Hydro CPU Water block. Corsair Hydro XD3 RGB Pump / Reservoir (This pum is actually very quiet. Corsair 12mm O.D. Hardline Compression Fittings. 12mm Stainless Steel Tubing for Water cool Loop. 7" HDMI Motherboard header LCD Screen with Aida64. 3.5" GoOverlay LCD in Corsair PSU Shroud. Mnpctech 360mm Overkill Custom CNC Machined Aluminum Radiator grill. This Corsair 5000T iCue RGB Custom case Mod will be on display at Corsair's new World Headquarters in California. Over the past decade, Bill Owen has created and built several PC case mods for Corsair to display at PC gaming events. These PC hardware and PC gaming centric events have included Pax East and Pax West, Comic-Con, Computex, and CES in Las Vegas. In 2009, Corsair hired Bill Owen to oversee the design of their new 400R Mid tower case by Corsair. Bill owns Mnpctech and has been doing custom PC case mods for past 22 years from his workshop and studio in Minneapolis, Minnesota. Several of Mnpctech and Bill Owen's unique custom gaming PC builds and PC mods are utilized to promote and market new PC game releases and PC hardware products. Often Bill Owen's custom gaming PC builds and PC mods are offered in online giveaways to help boost exposure of PC games or game expansion pack releases. You can see and purchase custom PC case mods and upgrades for your own PC from Bill's online PC Case Mod Store, Mnpctech.com
]]>You can also buy our pre-made Turntable Isolation Platform, HERE
We've received several requests asking to create this guide on how to make turntable Isolation platform from a hardwood butchers block bought on Amazon. Hardwood is a great material for absorbing vibrations. Butcher Blocks and Kitchen Cutting Boards are made from variety of hardwoods and the ideal size for vinyl turntables. A wood butcher block Isolation Platform provides vibration reduction properties to help prevent needle skipping or turntable humming.
Materials & Tools Needed:
1. Wood Butchers Block (18" Long x 14" wide x 1" thick) (Or larger if needed)
2. Four Butchers Block / Cutting Board Platform Isolation Feet
3. Power Drill and 1/8" drill bit
4. Measuring Square
5. Phillips Screw Driver.
6. Pencil or Marker
We're using this excellent budget Teak hardwood kitchen cutting board by Beefurni bought on Amazon Prime.
The Beefurni butchers block measures 18" Long x 14" wide x 1" thick. If you want a larger size board for your turntable, You can find other sizes of wood butchers blocks and cutting boards here on Amazon.
I'm using these Isolation Feet for the Kitchen Cutting Butchers Board.
The feet for the the wood butchers block include wood mounting screws.
You will need 1/8" wood drill bit to make pilot holes for mounting feet on the Butcher Block / Kitchen Cutting Board.
Use pen or marker to indicate location of feet in each corner, 1-1/8" from the edge of the Butchers Block / Kitchen Cutting Board / Turntable Isolation Base.
Center the location of the foot in each corner, 1-1/8" from the edge of the Butchers Block / Kitchen Cutting Board / Turntable Isolation Base.
Drilling 1/8" pilot hole in the Butchers Block / Kitchen Cutting Board / Turntable Isolation Base for the Mnpctech Rubber Isolation Feet.
Don't overtighten the Mnpctech feet for your Butchers Block / Kitchen Cutting Board / Turntable Isolation Base. You want the block to float on the foot, so the rubber cushions the weight and can perform better.
The Beefurni Kitchen Cutting Board is the ideal size for most modern budget turntables that include Linn Sondek, VPI, Fluance, U-turn Orbit, Audio-Technica, and Project Debut Carbon, vintage Technics, Pioneer, and Marantz turntables.
The Teak hardwood on the Beefurni Kitchen Cutting Board will accent the plinth on both vintage and new Vinyl Turntables.
You can make your own Butcher Block / Board isolation platform for any turntable, just make sure you measure the base of your turntable first.
Head on view of the Do-It-Yourself ISO platform made from the Teak cutting board and butchers block.
Now that your custom Turntable Isolation Platform With Wood Butchers Block From Amazon, clear off your audio cabinet so you can start using it enjoy your favorite vinyl records.
]]>This is the most simplistic How To Guide in the history of operating MNpctech's Custom Prebuilt Gaming PC Mod Shop.
Follow the easy steps below with photos to smooth your 3D prints. We often 3D printed our custom pieces with PLA-Plus for Mnpctech's prebuilt custom gaming PC's & Case Mods. These prints were 3D printed from PLA-Plus with 100% infill. After these are printed, we hand sand each part to remove the printed layers. Then apply 3M Bondo filler primer. Sand again with 80 grit sandpaper. Repeat applying 3M Bondo fillable primer if necessary until all pieces are smooth. That's all the steps involved in smoothing 3D printed parts and pieces for your projects. If you're a custom builder of projects like us, you don;t have alot of time to hand sand all of your 3D prints. This is the best solution and guide we've discovered in our workshop for smoothing 3D prints.Getting smooth 3D printed parts makes your projects look even better!
Of course you're thinking can I skip the sanding and just apply the 3M Bondo Filler Primer alone? You could, but it will take many applications of the filler to build up a thick layer. I strongly recommend sanding the pieces first as shown in the photos above, so you're not wasting the filler. Don't believe me? Just try it yourself and watch your primer filler can quickly drain.
]]>
Our only local resource for getting new sails made in Minnesota is Sailcrafters in St. Louis Park, Mn. I was told by Carl at Sailcrafters that the owner, Tim's Sail Maker Loft is the only one left in the Midwest.
I dropped off the sails on 12/10/21. Carl told me he would have to measure my sails before he could write up the estimate. Under Carl's advice, I'll be getting 6 ounce Dacron Sail Material "Super Cruise" with Cross Cut Pattern Stitch. The sail material is cut by Sailrite.com and then shipped to Sailcrafters.
Carl emailed me estimate On Monday, December 13, 2021, 10:10:25 AM CST:
The new mainsheet is loose foot, which allows the sheet to balloon outward and capture more air, which makes it more ideal for sailing on low wind days. You need to add "outhaul" rigging to the end of the boom on Newport 17, so you can adjust the mainsheet position along the boom.
You can tell a difference immediately. When I raised the mainsheet at the dock, the new "Cruising Sail Cloth" reacts to the wind faster than the old sails. On the water and changing tacks. it took me a few times to get used to how much faster the mainsheet and jib capture the wind. The lighter material also easier to fold the mainsheet over the boom at the end of the day. I can wholeheartedly recommend spending the $1,300 for new sails for your Newport 17 sailboat. The colored cloth also updates the overall look of the sailboat.
This is the official worklog for Mnpctech's custom PC build the INTEL ARC "Alchemist" Custom Gaming PC & Case Mod. Intel will be offering this Mnpctech Gaming PC For Giveaway.
•
• Intel Core i9-12900K Alder Lake Processor.
• 64GB ADATA DDR5 288-Pin Memory Modules.
• Intel 660p Series M.2 2260 2TB.
• Gigabyte Z690 AORUS MASTER LGA 1700 EATX Motherboard.
• Corsair HX1000, 1000 Watt, Fully Modular Power Supply, 80+ P.
This custom PC build will feature Intel's new ARC Gaming GPU and the new Intel Alder Lake Core i9-12900k.
Glass tubes from Alchemist Workshop.
Hire Mnpctech to build an amazing custom gaming PC for your new PC game launch or marketing promotion.
Inspiration for our INTEL ARC "Alchemist" Custom Gaming PC is Old World Female Alchemist meets Intel's ARC and Future Of Innovation Alchemist.
This ARC Gaming GPU along with the new Intel Alder Lake Core i9-12900k processor inside will feature many different materials in it's construction. Steel, Copper, Iron, Wood and two types of man-made leather will be incorporated around the Intel ARC system inside.
The Cooler Master Cosmos c700m chassis trim pieces painted with Rust-Oleum 314560A2 Universal All Surface Satin Bronze Spray paint. This color paint is perfect for this Victorian era look and Alchemist theme PC case mod.
I just love how great that Rust-oleum Satin Bronze color looks! It will accent the wood, leather and copper accents nicely. I look forward to using this paint for future gaming PC case mods and PC builds at Mnpctech Gaming PC Studios.
Painting the screws Copper on the Intel Alchemist Tube Holder ARC Gaming GPU PC Build & Case Mod For Giveaway.
Look at the progress on the INTEL Alchemist Glass Tube Holder on the ARC Gaming GPU PC Build & Case Mod For Giveaway.
I used RustOleum's "Hammered Copper" for custom painting the Cooler Master Cosmos C700M Chassis.
Hammering Copper piece for the custom Power Supply (PSU) Shroud on Mnpctech's INTEL Alchemist ARC Gaming GPU PC Build & Case Mod For Giveaway.
Copper trim pieces on the custom Power Supply (PSU) Shroud on Mnpctech's INTEL Alchemist ARC Gaming GPU PC Build & Case Mod For Giveaway.
The PC will be cooled with four Panaflo L1A 120mm fans. You dont even hear them...it's 30 decibels at full speed. What fan is it? 120mm Panaflo L1A. 68.9 cfm (cubic feet per minute).
Panaflo L1A 120mm fans have Static Pressure = 0.268 in H2O (66.7 Pa).
I painted the fan in Copper Metallic and added vintage metal decor with Mnpctech's Overkill Ring custom PC fan grills.
Inside the INTEL ARC Alchemist Custom Gaming PC & Case Mod For Giveaway Build By Mnpctech will feature the new FormulaMod 8.8 Inch CPU Hardware Temperature Monitor External Expansion Display High Resolution LCD Screen for PC ARGB Computer case with Secondary Screen.
Enter the PC Mod Level-Up Challenge on Intel's TechMesh site now.
The theme of the contest is “Future of Innovation.” Wow, this could mean so many things, right? If you really want to impress me and the other Judges, do something that blows our minds away versus another boring hardline PC build with RGB and stickers. You don't have to leave that bequiet 802 case stock!
Suffer from short attention span? then go directly to contest page below!
Enter the PC Mod Level-Up Challenge on Intel's TechMesh site now.
Seven people will be chosen based up their ideas submitted for what “Future f Innovation” means to you. Read and follow the directions closely. I've noticed people are not reading the directions and they're submitting their own PC mods to the Project group. These will be ignored or deleted!
Mosquito Mods assisted me during the Intel Creator Challenge Event, that is why his Youtube channel is published during my live segments. He's got some great PC Modding projects on his channel, so check it out and subscribe!
Where’s the RGB in that bequiet PC case? Impress us without it and really think about how you can do something spectacular and different!
I've been involved with countless multiple PC & Case Modding Contests since the year 2000. My involvement with past PC Mod competitions involved every facet from hosting, organizing to judging and competing. I stopped competing in all PC Modding competitions in 2016. Some competitors in Cooler Master's 2016 Case Mod World Series event felt that me owning Mnpctech gave me an unfair advantage. I do own a fully equipped fabrication shop where I can dream and build almost anything, so I politely obliged to bow out of that event and all future related PC case mod competitions.
Updated 12/6/21
The Intel PC Mod Level-Up Challenge Finalists Announced.
After careful consideration from the Intel panel of judges, they have identified our seven (7) finalists who will receive an email shortly for next steps. The finalists are as follows (in alphabetical order):
This video guide shares "How To Tip Your Sailboat And Fix or Replace Your Sailboat Centerboard Keel Line.
At some point during the ownership of a vintage sailboat, you will be faced with having to make this challenging repair. You can either bring your sailboat to a local Marina with a lift or do this technique which is "Careening" your sailboat. The individuals in the video guide are using an O’Day 21 Sailboat, but the method can be applied to any Daysailer size sailboats. I've witnessed this centerboard swing keel repair done on many different sailboats that include Hunter 15 Sailboats, Catalina Sailboats, Laser Sailboats, Hobie Sailboats, Sage Sailboats, Norseboat Sailboats, Fareast Sailboats, Lido Sailboats, Lockley and Newport Sailboats, and Montgomery Sailboats or Rhoads and Flying Scot Sailboats.
The rope that drops and pulls up the Sailboat centerboard / keel will eventually deteriorate from usage and outdoor elements. The original sailboat centerboard in this O-day 21 line had lasted over 30 years! This video illustrates the easiest way to tip your sailboat with help from friends so you can gain access to the swing keel and replace your sailboat's centerboard line / rope. We are using the main halyard line to pull and tip the sailboat on it's side. Don't worry, you won't bend your sailboat mast which concerns watchers. A sailboat's mast is designed to handle force and pressure from the main sheet while you sail.
There's been a lot of feedback surrounding this video guide for replacing your sailboat centerboard rope. One side of the public warns "This is too dangerous, you can bring your sailboat to a Marina and pay for a Lift" while others say "This is how Sailers over the decades have made their repairs when you're away from any public resources." Not everybody who sails can afford to run to the Marina service whenever something goes wrong with their sailboat. In Minnesota, we are a sailing community of Do-It-Yourselfers! We don't have any resources on land that offer sailboat servicing. We always try to help one another with upgrades and repairs to our sailboats.
]]>If your Canon printer is over two years old, Canon's Tech Support will not help you unless you buy their CarePak PLUS service at $49.99 for every two years.
I followed all of the troubleshoot steps Canon's website advised.
• Cleaned out printer, unplugged and re-plugged cables as instructed by Canon's website for the 6A81 error.
• Connected my HP Inkjet 1020 to same PC to confirm I could still print files. HP printer worked fine.
• Replaced USB and power cable on Canon Pixma ip8720 and still got same 6A81 error.
• Removed and reloaded drivers from Canon website and re-tried at least 10 times throughout my day. Still getting the 6A81 error.
Connected my Pixma ip8720 printer to a different PC, installed software and drivers from Canon website and still got the 6A81 error.
In case I was over looking any steps, I phoned local Computer Tech Support to re-install the Canon Pixma ip8720 printer for me. He got the same 6A81 error.
Having no success with manufacturer recommended fixes, I surfed the web and many people suggested cleaning the area around the "Black Rubber Absorber Pad" and surfaces around it from any excess ink.
I decided to get into this further by taking off the entire cover for full access to cleaning the "Black Rubber Ink Absorber Pad" and area around it. I unplugged the printer and used Philips screw driver to remove the two screws in back cover. Then I used a BUTTER KNIFE to gently pry apart by the back cover. Pry upward on the bottom of the cover to release the tabs. Do the same for the both side covers and the top cover.
You'll need to unplug the Wifi Antenna before the top cover can be removed.
Canon Pixma ip8720 "Black Rubber Ink Absorber" circled in Red.
The rubber ink absorber pad was covered in Black ink. I used a cotton cloth with soapy water to soak up all of the Black ink.
After cleaning the ink absorber pad and area around it, I plugged in the printer. The Red lights under the ink cartridges returned and front Yellow light wasn't flashing. This is a good sign. I unplugged the power cord and re-attached all of the plastic covers and re-connected the WiFi antenna. I re-connected the Canon Pixma ip8720 printer to my PC and powered it on. I ran TEST print and the ink looked blotchy. I then did the Canon ip8700 software maintenance steps.
Goto
• Windows Start button (bottom left corner)
• Settings
• Devices
• Printers & Scanners
• Select Your Printer (Canon ip8700 series)
• Manage
• Printing Preferences
• Maintenance Tab
Go through all of the steps circled in Red above.
After doing the Canon Pixma ip8700 series maintenance steps, my print outs looked perfect! Hopefully this solves your issue, but
Remember, If your Canon printer is over two years old, Canon's Tech Support will not help you unless you buy their CarePak PLUS service at $49.99 two year agreement. It's very likely in my personal opinion that Canon Support will tell you that your Canon Pixma ip8720 printer is too old and there's nothing they can do.
]]>
I signed up with Discovery+ on 1/6/21 for $6.99 per month without any ads. You can watch the first three episodes on this app before they air on Discovery channel. There is a total of eight episodes of the new 2021 season of Monster Garage. I've posted an overview description with photos of each new Monster Garage episode below.
I created this simple episode guide as I'm a fan of the original Monster Garage series. I own all of the DVD box sets released by Discovery Channel. I also own these Monster Garage "How to" books that were released during the series.
This is episode one of the new season reboot of Monster Garage. The show opens with the return of announcer Schwag's voice! Then we see little person, Body Drop dressed like a chauffeur. He opens the door on rusty a Jaguar with Jesse sitting in the back seat. "Everyone asked when I'm bringing the show back?" Body Drop welcomes Jesse back with a fist bump. I assume Body Drop will be fulltime as comedic relief for this season.
In this premiere Jesse gathers a crew of five skilled people to install a 12ft pulsating rocket engine in a 1965 Jaguar. "I can't believe it's been 14 years" Jesse says as he forgot how grueling these builds can be.
If you're hardcore Monster Garage fan like me, the format is exactly the same. There's a good mixture of people and drama over finishing the car on time. Jesse remarks this crew might get a small Cresent wrench from Walmart instead of the Snap-on tool boxes. It's cool to see the same format return flawlessly, but I do hope Jesse implements some new things to surprise us. I give premiere episode of Monster Garage 10 out of 10 stars for feeling like it never left us.
This is the 2nd episode of the new season of Monster Garage. Jesse tells this crew he wants to transform an International Harvester machine into a Hot Wheels style dragster. Everyone is excited for this challenge and ready to work!
Tearing apart the Combine / Corn Chucker takes two days. This is the longest vehicle tear-down in the history of Monster Garage.
Monster Garage crew member, HOGBEAR Terry creates some good drama in this episode. His antics in breaking or losing crucial parts are hurting the momentum of the build. We're introduced to him using a garbage can lid to protect his head from sparks during tear-down of the International Harvester.
HOGBEAR's goof-ups are pushing Jesse's patience to the limit. Jesse learns the sheet metal backing for the Harvester's steering column is missing. Jesse asks HOGBEAR if the part was thrown in the dumpster? HOGBEAR says he didn't throw anything in the dumpster. Jesse walks out to dumpster and tells him "I'll look while you go back to fiddle fuckin whatever you're doing." HOGBEAR responds with "You go fiddle fuck too then." Jesse finds the missing part in the dumpster which escalates to a bigger confrontation in the garage.
After the Drag-bine is finished, Jesse brings it to a local farm to race a stock International Harvester in a corn field. There's a hot headed farmer taunting Jesse that he would lose a race between them! I think this angry farmer was inspired by HOGBEAR. "Shuckin' Dragster" is a great Monster Garage episode. It has a good mixture of edutainment and drama. I learned a lot about diesel engines and heavy duty farm equipment. Watching Jesse get annoyed by HOGBEAR added some drama. The final result of the build is awesome. It does look like a Hot Wheels car! I give the 2nd episode of the new Monster Garage 10 out of 10 stars. It has every element that makes the series great.
In episode 3 of the new Monster Garage series Jesse James wants to create a "Sleeper Sailboat" with a hidden V8 engine and enter it a sailing regatta race. Everyone expect "Sailor Grant" from New Zealand on the build team is disappointed. They anticipated seeing a car to modify instead of a sailboat.
A sailboat in the garage?! In this episode of the new Monster Garage we really see the team pushed against the deadline.
Another episode of somebody digging in the trash for a missing part. There's always one team member on Monster Garage who annoys everyone. Sailor Grant holds up progress by losing part and getting in everyone's way.
Jesse notices there's foot prints on the chrome engine injector blower hat. "I might of done that" responds Sailor Grant, wearing an Aquatic Ed shirt. "I'm gonna fuckin smack someone if I see them do that" Jesse grumbles at Grant.
Jesse James tells audience "Unfortunately this was Monster garage failure number 8" as we see the sailboat in the middle of the Arizona desert. Episode 3 of the new Monster Garage ends with the best destruction of a failed build in Monster Garage history. Two military grade helicopters spray the sailboat with red hot 3,000 rounds of ammunition per minute. Jesse is co-piloting a MD 530G Scout Attack Helicopter and backed up by BELL 407 Multipurpose Utility Helicopter. I give the 3rd episode of the new Monster Garage 7 out of 10 stars. You learn some interesting elements about propulsion, but you could tell the team wasn't thrilled about doing the build.
Jesse tells the team that they will be building a "wood powered corvette"
Shwag gives the audience a lesson on how a gasification and gasifier fuel system works. It was a popular modification to large vehicles like buses and ships during the fuel shortages in World War II.
Jasmine feels frustrated that she's not being guided by the twin brothers (wood nerds) on specific tasks she should be handling. Jesse explains to the audience that some build teams need management. In this project, the two brothers are holding all the cards on what needs to be done. They should be guiding their team members, but they're used to working alone. You've only got two days left, and nobody fully understands their roles and how a wood burning fuel system works.
Final five hours the brothers struggle to get the right one-to-one air and fuel mixture to make engine run. Jesse watches in frustration "They don't have a clue what they're doing."
Jesse James notices the starter starts smoking. Jasmine jumps under the car to replace the starter. Luckily the brothers get it to run with 11 minutes to spare on the clock! Jesse says "damn, I was looking forward to blowing it up!"
Jesse pushes the gasification wood powered Corvette into a BBQ Rib contest and asks for spare wood. After enjoying and judging one of the BBQ contest entries, Jesse wants to see how fast this Corvette can go? We see one of the brothers armed with a radar gun alongside a long country road. The wood burning Corvette clocks in 71 mph! That's pretty damn impressive for wood fueled car. I give the 4th episode of the new Monster Garage 10 out of 10 stars. You learn about wood fueling a combustion engine and good drama right down to the wire.
In episode 5 of the new Monster Garage, Jesse pays tribute to the era of Moonshine runners and outlaws. Prohibition in the United States was a nationwide constitutional ban on the production, importation, transportation, and sale of any alcoholic beverages from 1920 to 1933.
The challenge is to transform this derelict 1947 Ford coupe into an outlaw speak easy on wheels. Complete with a fully functioning whiskey still. The ford's flat head engine will also run on the alcohol produced by the still. The Monster Garage team can only spend $5,500 on parts and has five days to build the car.
Jesse tells the team they're going to make a Moonshine still, but disguise it as a "Fat Fendered" 1947 Ford. This thing should drive out on it's own power and make whiskey. We will distill our own booze and car fuel. The 1947 Ford sat outside "Rusty The Mule" bar for 10 years before Jesse rescued it.
Arthur Werchan is eager to please Jesse after being scolded for hammering a part on Jesses' "machined" top work table. On day 4, Arthur stresses out about revising his retractable drawer for the distiller. Jesse says it won't extend out far enough. It needs a turnbuckle system to increase the travel from 22" to 50".
Jesse James' Shotgun Whiskey mobile distillery utilizes a two stage heating system. It draws heat from the Ford's radiator and exhaust to warm the mash in the copper pot. The large copper pot is heated to 180F and drains the alcohol into the copper condenser or "hooch".
The 1947 Ford was given a custom paint job, "Jesse James Shotgun Whiskey" airbrushed by West Coast Choppers. This was another good episode with the right combination of education and drama to keep you watching.
Episode 5 of the New Monster Garage starts with Jesse James announcing "This is a really dumb idea." The goal is transform a Chevrolet Dually Duramax 1 ton Pickup truck into a mobile "Shingle Mill" within 5 days.
Del is the antagonist in this episode of Monster garage. He damages some of the Monster Garage equipment and accuses Jesse of not leading the team. Del's son's Casey yells "Anyone know where our fearless leader is at?" while trying to find Jesse. Del responds with "He's probably sleeping in and working on another wife." The reality was that Jesse was at his home shop fabricating the carriage to hold everything in the back of the truck.
Terry Wilson brings a great positive attitude and comedic relief for the team.
Terry suggests that Rae gives the exhaust tip extension a custom look. Rae Ripple cuts the Monster Garage logo into the truck's tailpipe. Terry shows the finished piece to Jesse James. He's annoyed Rae wasted two hours on doing the design instead of making further progress on the truck.
Jesse James' French Bulldog sits on the couch in the Monster Garage while watching the team fall behind on the shingle chucking Chevy.
Andy carried the weight of the
One hour left and Jesse James reminds the team they didn't make a chute for the shingles. "You can't put your arm near those saw blades when grabbing shingles, and I can't have somebody lose their arm on Monster Garage."
"I bet you wish you had those two hours back, instead of wasting them on a custom tail pipe."
We see Jesse James in a large field with the truck. He uses a handheld dynamite detonator to blow it up. He drives off into sunset in his Hummer.
I give the 5th episode of the new Monster Garage 5 out of 10 stars. You learn about shingle milling, but did anyone ever care to know? I felt empathetic to the team's mediocre feelings about the project. Rae and Andy were fans of the show and had fun making the exhaust tip instead of long safety chutes. This was the second failure for this new season of Monster Garage and seventh in the history of the show.
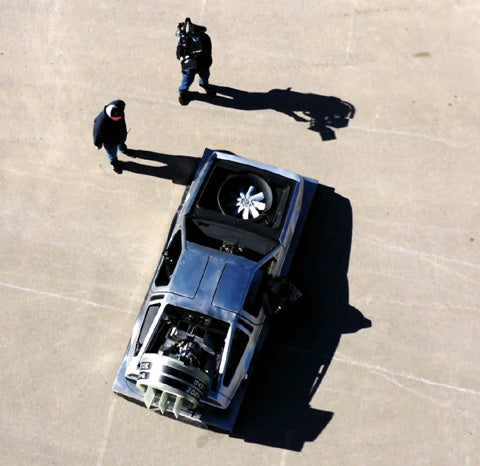
Fans will love this episode of the new of Monster Garage series. Jesse seeks redemption for his Delorean Hovercraft build failing seventeen years ago.
Jesse starts episode by promising "Let's make this one bigger and badder than before." This new Delorean Hovercraft will utilize a gas turbine helicopter jet engine instead of V8 engine used in the original concept.
Rick Gendreau was the first man kicked off a Monster Garage episode. Jesse invited him back to redeem himself. "I'm happy to tell you you're not the only guy to get kicked off Monster Garage." Rick was a key player in the fate of the first Deloren Hovercraft failing. "You think this is funny? That's a Hovercraft decorated like a Delorean. You see me laughing? Get the fuck out of my shop!"
"This time I'm going to be the best I can. I think what happened last time is that I didn't come with the right attitude."
Jason Kuehn's inaccurate measurements and lack of communication could make this build another failure. Jesse and other team members had already fabricated parts and made modifications before learning from Jason they needed to be changed.
"You guys gotta figure out what the fuck you're doing. We can't be making the same parts over again with only few days left. I'm not making anything else until you guys figure out what the fuck you got going on."
Last minute revisions and remaking parts could keep this Monster Garage redemption build from finishing by the deadline. Jesse is becomes annoyed.
There was a lot riding on this build being finished! Jesse is very pleased with the final results. It's really fast once you learn how to drive it.
Jesse asks "Did it look cool?!" He wished Rick was there to experience it.
I give the 6th episode of the new Monster Garage reboot 10 out of 10 stars. It has a perfect combination of edutainment and drama. Jesse was happy to see the first guy kicked off the show to be given another chance for redemption.
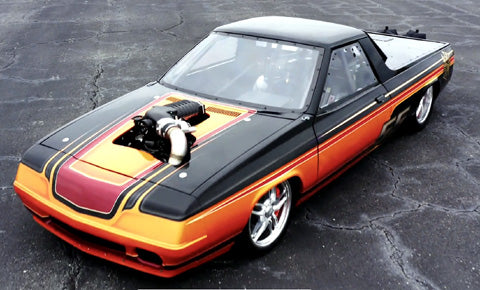
Jesse James tells the team he wants break the Monster Garage 200mph car build curse! This time we'll have a 1200 hp Texas Speed engine.
Jesse James tells his "superstar" build team that Monster Garage has attempted to build a 200 mph car in three past episodes. The Toyota HELLICA almost achieved it at 195 mph. In this episode of the new Monster Garage he wants to make this old Dodge Rampage reach 200 mph. The build team is speechless.
The team will add 8" to the wheelbase of the Dodge Rampage, so it's more stable when Jesse attempts to reach the 200 mph goal of speed! The Roadster Shop sent the Monster Garage team a new chassis to make things easier.
Robby Woods realizes he made the angle of the chassis extension too steep. It doesn't follow the Rampage body lines, so they've got to revise the design.
Greg Hogue guides the 1200hp Texas Speed engine into the custom chassis.
Tommy Delago scolds Greg Hogue after he breaks an ignition coil wire connector by hammering on it.
Jesse James grinds opening in the Rampage for his custom exhaust pipes.
The Dodge Rampage was built in five days! The final result of this Monster Garage project car build is the best I've seen in the entire series. If Jesse were to offer diecast models for this season, I'd be interested in getting this custom Dodge Rampage from the new Monster Garage series on Discovery+.
Interesting that Jesse didn't destroy the Dodge Rampage for being a failure at achieving 200mph. He said he could feel the car wanting to go faster, but the throttle cable broke. The Monster garage 200mph car build curse continues...
Hopefully Jesse brings back the new Monster garage for another season and attempts this record again with another project car. I give the 6th episode of the new Monster Garage season reboot 10 out of 10 stars. The build team did a kickass job on the car build in only fiver days! It's the best car build in my opinion of the new Monster Garage series.
It was a great season with several of the builds influenced by Jesse's new life and garage location in Texas. The ending results of the Harvester dragster or Moonshine Rod in Long Beach California wouldn't have been the same.
Sadly episode eight was the last episode of the new 2021 season of Monster Garage. I hope this season of the new Monster Garage brings back old fans and creates new ones, so Discovery asks Jesse to do another season next year.
]]>Touch Screen TFT LCD Gaming PC Case Mod Guide by Mnpctech
Hi everybody! Bill Owen from Mnpctech. I hope you're having a great day! Several people have asked if I could share the steps on how I do my Touchscreen LCD mod in PC Computer case bezels, and you’ve come to the right video!
Product Links:
5" Touchscreen LCD for PC, https://amzn.to/3muvht9
3ft “Right Angle” 270 degree HDMI cord, https://amzn.to/2ZUjzl4
6” 90 Degree Angle HDMI Extension Adapter, https://amzn.to/2ZZB9V3
*3ft USB Male to Micro power connector, https://amzn.to/2O1eiBe
Twelve 6/32 Black washers, https://amzn.to/2O19Ylm
PC Thumbscrews for PC LCD Mod, https://tinyurl.com/y2jp23xu
3/16" Black Matte Acrylic Sheet, https://amzn.to/2NfWVgc
Dremel Wheels, https://mnpctech.com/pc-mod-tools/cutting-wheels.html
I’ve been using this Amazon 5 Inch Capacitive Touch Screens for $52.99 delivered on Amazon Prime, I’ll posted a link in Video description. The kit comes a with Micro USB for power and HDMI video connector, but these cables are too short for these PC case mods. It includes M3 stand-offs, a Driver Disc and some Instructions. It’s a 5 point Capacitive Touch screen with a Resolution of 800 x 460, which is just fine for it’s 5” viewing screen In addition to the LCD touchscreen, I will buy the following cables for my Desktop Custom PC LCD Case Mod.
One 3ft “Right Angle” 270 degree HDMI cord, 6” 90 Degree Angle HDMI Extension Adapter, and 3ft USB Male to Micro B power connector. For Mounting the LCD Touchscreen Panel, I use 3/16” thick Black acrylic to make custom mounting brackets for the LCD touch screen.
You can use this 5" LCD for AIDA54 Extreme or Rainmeter.
You can PAUSE the video on this page to record the measurements that I’ve made for cutting the acrylic. This PC Case Mod is very easy. "The reason I’m making brackets for my desktop PC LCD Monitor Mod?" I want the ability to easily install or remove the Touchscreen with thumbscrews. I’m using 1/8” drill bit for acrylic, and 6/32 thread tap, These Black thumbscrews from Mnpctech.com. I’ll use the 1/8” drill bit to increase the diameter of the holes in the LCD pcb frame.
I discovered these drill bits for plastic several years ago, Notice the bit isn’t splintering or cracking the acrylic as I make the holes. Mnpctech stocks a variety of these drills bits. My mod requires Twelve 6/32 washers, and links posted in description, “Why so many washers?” We want the Touchscreen to mount flush on the backside of the bezel, I also don’t want to apply any unnecessary pressure to the screen or the PCB, See how this sheet of paper easily slides under the screen Next stage is cutting the hole in the bezel, The best PC case for this mod is the ones without optical drive bays, which every popular case manufacturer now offers.
If you’re using an older case with 5.25 drive bays, you could attach a mounting plate with 5” opening that covers THREE 5.25 bays. That’s how we did this mod in the early days of PC Modding. Determine and measure out a location in the center of your bezel, you can also mount the LCD vertically if you prefer, and just change the screen orientation in Windows. Since the bezel is plastic, I’m using a Dremel with 1.5” reinforced cut off wheel, Don’t forget to always wear eye protection when using power tools. Oops, WTH? Hahaha After cutting our 5” diagonal square hole, I’ll hand file the edges so everything is precise and clean. You may have to remove sound insulation foam from backside of your bezel, I’m using E6000 adhesive to attach the two mounting brackets. This adhesive is very GOOEY at first, so consider masking off the screen, to prevent getting any of this on it. I like that it’s tacky for couple of minutes, so I have time to position the LCD in place, and then I’ll temporarily tape it in place while it cures overnight.
Mounting your Touchscreen LCD in the PC this way allows you to easily remove and re-install the LCD at any time. Especially if you ever need to replace it for some reason. Let’s get this LCD touchscreen connected to the PC, all of the cables are routed from the front to thee rear PCI slots. *3ft “Right Angle” 270 degree HDMI cord *6” 90 Degree Angle HDMI Extension Adapter cable, I plug this compact cable into the Touchscreen to save space. *3ft USB Male to Micro B power connector This mod is great if you want an extra screen for monitoring your hardware and temps. You can also display Weather or calendar or email notifications,
Check out http://www.Rainmeter.net this community offers several hundred custom mad graphic interfaces for FREE, and you can configure your screen to display a variety of updated information tasks Thanks for watching! And Again, all of the products used in this PC case mod are listed in the video description.
Have a fantastic PC Modding day!
]]>Universal Laser C-200 Laser Kiosk User Manual Download PDF
Universal Laser MVX Windows 7 Printer Firmware Driver WinZipfile
Universal Laser MVX Windows 7 Firmware Install Instructions PDF
Replacement Gas Lifts for Universal Laser C-200 Laser Kiosk Cover Part Number 3028EQ for $23.50 from Monroe Magnus
Hello, I will assume you discovered this page while searching for information on used Universal Laser C-200 Engraver / Laser Kiosks. I created this page because there was no information before I purchased my unit. This page will serve as a journal to document my experiences in resurrecting a used Universal Laser C-200 Laser Kiosk machine. You'll notice that I will use description "Universal Laser C-200 Laser Kiosk" often. This is to help my page get discovered in search engine results.
November 26th, 2020
I bought this used Universal Laser C-200 Laser Kiosk for $1000. It's UL-25 Watt model built in 2001 with serial #5213A. The seller told me it powered on, but they didn't know if it still worked. I knew this purchase could lead me down an expensive rabbit hole. I also knew Universal Lasers have the best reputation in the industry for their small business / hobbyist lasers.
December 3rd, 2020 (Need to exhaust the toxic fumes)
I delivered to the C-200 to my friend Don Matthew's workshop. Don's an Engineer and Electronics Guru. We made a deal that the laser will reside in his workshop. I cover any expenditures it needs. In return he oversees any laser jobs that I need done. We found this Universal Laser C-200 Laser Kiosk User Manual and learned it requires 4" diameter inline fan connected with hose to the base. You need to exhaust the toxic fumes from your workspace. 150 CFM @ 6 inches of static pressure or higher. The best deal I found on the exhaust fan was this 4" inlet / outlet commercial exhaust fan sold by McMaster-Carr. You can find cheaper inline fans on Amazon, but they're going to be thin plastic and loud.
December 24th, 2020. (Laser Tube bad)
After setting up the C-200 Laser Kiosk, we cannot see the Laser when running the program. I contacted Universal Laser Support. Tech Doug Lewis from Florida was quick to respond. Doug told tell me since the unit had sat in storage for a decade, it's likely the Co2 charge in the laser tube is bad. I contacted Universal Laser Head Quarters in Arizona about ordering new laser tube (cartridge). The new laser unit for the C-200 Laser Kiosk part# is 131-0051-R3-A UL-25 LASER and costs $1650.00 with included shipping. They require a "White Glove" exchange, meaning Universal Laser ships new laser tube via UPS and you must give the driver the old laser tube in exchange.
The C-200 Laser Kiosk came with a Dell Inspiron 2500 laptop with Windows 98 and ULS Engraver software pre-installed. The laptop mounts to the side of the C-200 Laser Kiosk with a detachable shelf. This metal shelf includes a conversion cable to connect to the Laser with included 50 pin parallel connector cable. Windows 98 brings you to the desktop, then automatically opens the ULS Engraver program. I couldn't figure out how to bypass this program, so I could return to the desktop. Control-Alt-Delete wouldn't open Windows Task Manager. If you exit the program, it shuts down the laptop. Maybe a keystroke closes the program, but no information was available from the person selling the C-200 Laser Kiosk.
If ULS Engraver program starts before you can open System Utility Window
December 23rd, 2020
I mail a check for $1650 via Priority Mail to Jorge Lopez (info below) at Universal Laser. He told me I would be notified via email when the replacement tube was shipped, so I could anticipate it's arrival and exchange my old tube with the UPS driver.
Jorge Lopez | General Accountant
December 29th, 2020
UPS driver arrives with new laser tube / 131-0051-R3-A for my Universal Laser C-200 Laser Kiosk. This is called a "whiter glove exchange" I open box in front of UPS driver and swap my old laser tube with for new one. The return label is already attached to the box.
January 4th, 2021.
Don emails me to confirm new laser tube is working!
]]>
Following the design of Lian Li's popular O11D case series, the Lian Li Dynamic O11D MINI brings in small changes giving it a clean modern look.
As of, 11/20/20, You can pre-order it with these retailers
The LIAN LI O11D MINI is now available from Newegg:
Black: https://www.newegg.com/p/N82E16811112593
White: https://www.newegg.com/p/N82E16811112594
The LIAN LI O11D MINI is now available from Caseking:
https://www.caseking.de/o11d-mini
The LIAN LI O11D MINI is now available from Overclockers UK:
https://www.overclockers.co.uk/lp/lian-li-011-dynamic-mini.html
Starting with airflow, the top, rear, and bottom ventilation holes now feature a honeycomb pattern for improved performance. While the white version sports an elegant brushed aluminum strip at the front of the case, the black version replaces this strip with glass and adds acrylic (with brushed silkscreen underneath) at the top. Both versions feature the same IO at the top, which includes one audio/mic jack, two USB 3.0 ports (Type-A), one USB 3.1 port (Type-C), and a power button.
This engineer drawing shows you the radiator sizes that can be installed in the new Lian Li 011D Mini module chassis for PC water cooling.
The Lian Li Dynamic O11D MINI black and white are available for pre-order starting November 20th, 2020, at MSRP $99.00 USD. Optional accessories will soon be available after launch, including a replacement backplate to mount the GPU vertically, as well as a hot-swap backplate add-on for the drive cage. In addition, a version of the Lian Li Dynamic O11D MINI including a fully modular 700 watt 80+ Gold SFX PSU will be available in the near future. For more information, visit the official product page: https://www.lian-li.com/o11-dynamic-mini/
Early glimpse photos at the very first White Lian Li Dynamic 011D Mini DeBaur case details including specifications and PC build.
Model |
Lian Li O11D MINI |
011D Mini Dimensions |
(D) 420mm x (W) 269.5mm x (H) 380mm |
011D Motherboard Sizes |
E-ATX(width: under 280mm)/ATX/M-ATX/ITX |
PSU |
SFX / SFX-L |
Color |
Black / White |
011D Mini Case Materials |
0.8mm SPCC (Body) |
011D Mini Fan Support |
Top: 3x 120mm or 2x 140mm |
011D Mini Radiator Sizes |
Top: 1x 360mm or 280mm radiator or 240mm radiator |
011D Mini GPU Length Clearance |
395mm |
CPU Cooler Height Clearance |
170mm |
Drive |
Right side: 2x 2.5” SSD |
Expansion slots |
3 or 5 or 7 slots (depends on backplate) |
I/O Ports |
1x HD Audio |
Dust Filters |
1x Top (magnetic) |
The Lian Li Dynamic 011D Mini DeBaur case redefines modularity in a small PC case.
The new Lian Li 011D Mini can fit motherboard sizes that include ATX, Micro ATX, and Mini-ITX. Lian Li Dynamic 011D Mini DeBaur allows ample support for AIO or DIY water-cooling configurations.
Magnetic filter on top of the Lian Li 011D Dynamic Mini PC case.
Depending on the motherboard form factor you have chosen, the Lian Li Dynamic 011D Mini can acomodate up to three 280mm radiators with a mini-ITX motherboard installed. You can fit a 280mm and 240mm radiator with a M-ATX motherboard.
You could also use two 240mm size radiators with an ATX sized mother board. Lian Li will include three motherboard trays with the 011D Mini, so you have the choice of which motherboard form factor you would like.
]]>